I almost missed it but this year was the tenth anniversary of clj-net-pcap. clj-net-pcap is a wrapper/adapter/facade (No matter how you want to call it.) around jNetPcap, which itself wraps libpcap, that enables and eases packet capturing with Clojure.
Feature-wise, there hasn’t been much happening in the past years. In fact, aside from what I did this year, the last notable changes happened around 2017/2018.
This year, I worked mostly on trying to keep clj-net-pcap prepared for the future. This work included:
Patch the jnetpcap code to fix some problems I encountered. The clj-net-pcap git repository includes a clone of the jnetpcap development branch and the changes I applied on top of it in the git history.
Re-build the readily built native libraries shipped with the jar file.
Add some more improvements for Windows and FreeBSD ports. The Windows and FreeBSD ports are still work-in-progress and will likely have some issues here and there.
Rebuild everything to provide a standalone jar file in the git repository and updated individual jar files on clojars.
clj-net-pcap version 1.8.4 was tested as follows:
My development enviornment still is Fedora 36 on x86_64 (Yes, I need to update to 37). This is the main development environment I use and the unit test results as published on the clj-net-pcap github pages were executed here.
In addition to running the full test suite on Fedora 36, I executed the test suite on Debian 11.4 within VirtualBox for x86_64 and i686. For all these environments, the tests passed successfully.
On Windows 10 x86_64 in VirtualBox, I rebuilt the native libs and ran some simple experiments with the standalone jar file. These experiments showed that, in general, package capturing etc. seems to work. However, some automated tests fail. Unfortunately, I did not have time to investigate this further.
On GhostBSD x86_64 in VirtualBox, I rebuilt the native libs for FreeBSD and ran some simple experiments with the standalone jar file. Package capturing seems to work somewhat. Sometimes, errors show up because mismatched wire/capture length. Also some automated tests fail. Again, unfortunately, I did not have time to investigate this further.
I hope that the new release is a step towards making clj-net-pcap more future proof, e.g., because it now mainly links against libpcap >1.0, which improves support for recent distributions. My main focus was on Linux but additonal work was already done for the Windows and FreeBSD ports as well.
I hope that these updates are helpful. If you have constructive comments or feedback, please let me know.
In this post, I write a bit about some things I did for fun in the area of Message-oriented Middleware (MoM). I am not sure how much others relate to this but I hope that some may find it a bit entertaining as well.
With “Polyglot Messaging”, I refer to jointly using multiple MoM protocols. With “Polyglot Integration”, I refer to integrating implementations written in different languages (C, Clojure, JavaScript, and Python) via the Polyglot Messaging.
Overview
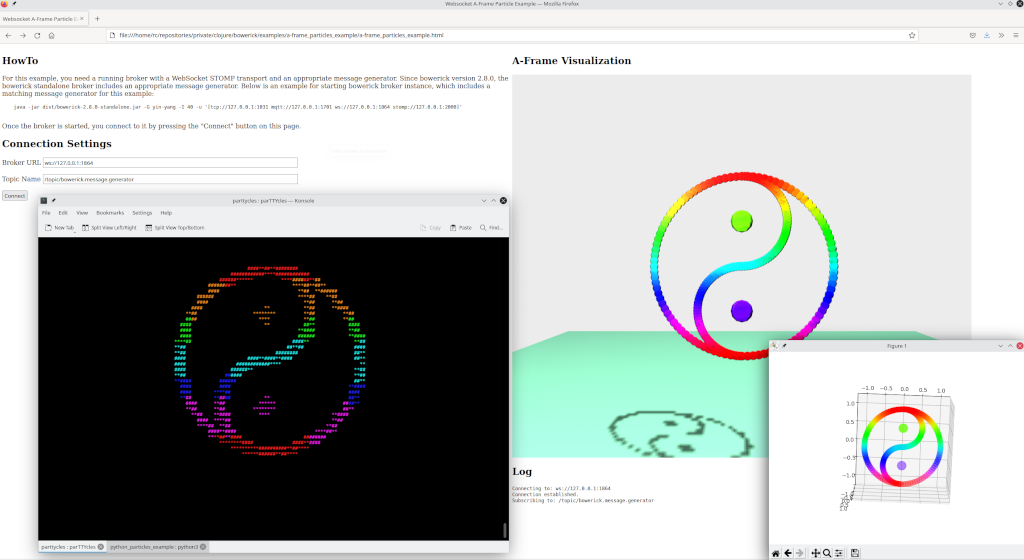
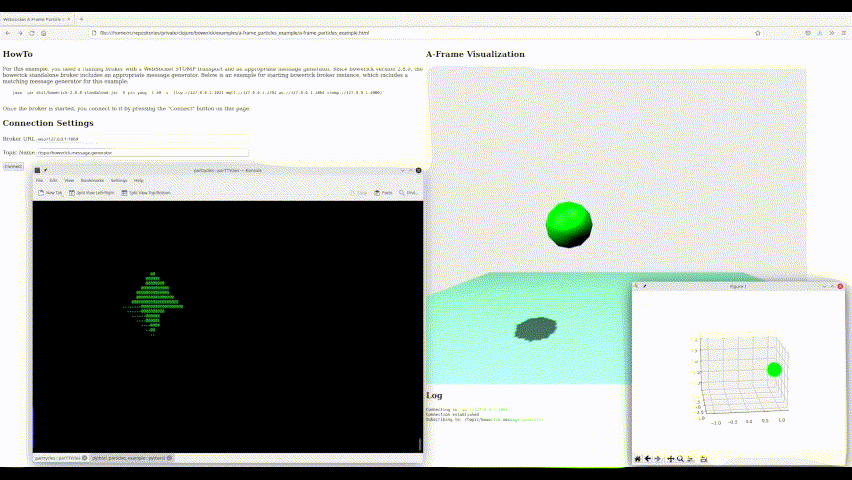
To cut a long story short, the image below shows the visible outcome. It shows three applications that display data that was generated programmatically and sent via a Message-oriented Middleware (MoM). As a bit of a teaser, there are also animations that show the data in motion a bit further down in this post.
The generated data sent via the MoM are dots in a 3D space that resemble a rotating rainbow-ish colored Yin Yang symbol. The applications shown in the image are:
Bottom Left: An application implemented in C that 3D-renders to a terminal. I called it parTTYcles. It is based on TermGL, MQTT-C, and json-parser.
Bottom Right: A Python application that renders the data via matplotlib.
Background Right: A web page that renders the data via A-Frame.
Setup
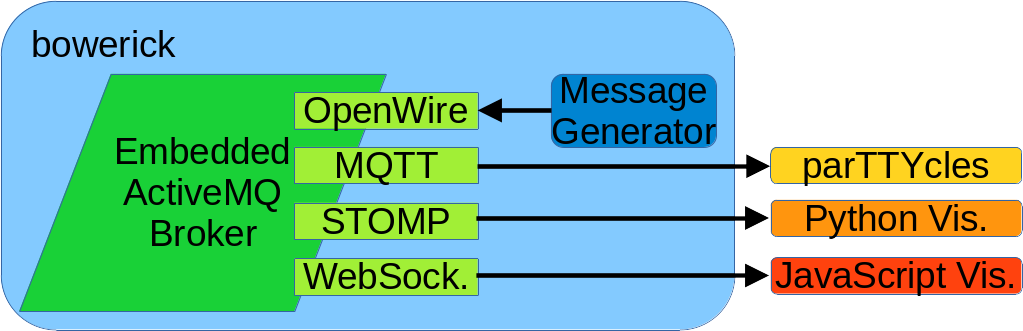
The image below shows an overview of the setup and how the different elements interact.
Polyglot Messaging Integration Setup Overview
bowerick is the central part that provides the Message-oriented Middleware (MoM) and message generation. bowerick and its message generation are implemented in Clojure, indicated using Blue color. bowerick wraps various MoM-related libraries such as ActiveMQ etc., which provide, e.g., the embedded broker and the transports for the supported protocols (OpenWire, MQTT, STOMP, and STOMP via WebSockets).
Most of the libraries used in bowrick are implemented in Java, indicated using Green color. I feel very satisfied with using Clojure for implementing the surrounding bowerick code and its automated tests (not shown here).
I started development of bowerick in 2014. Since then, I regularly evolved bowerick and kept all dependencies up-to-date. I am very happy with the entire ecosystem and found that Clojure is a great basis for this work.
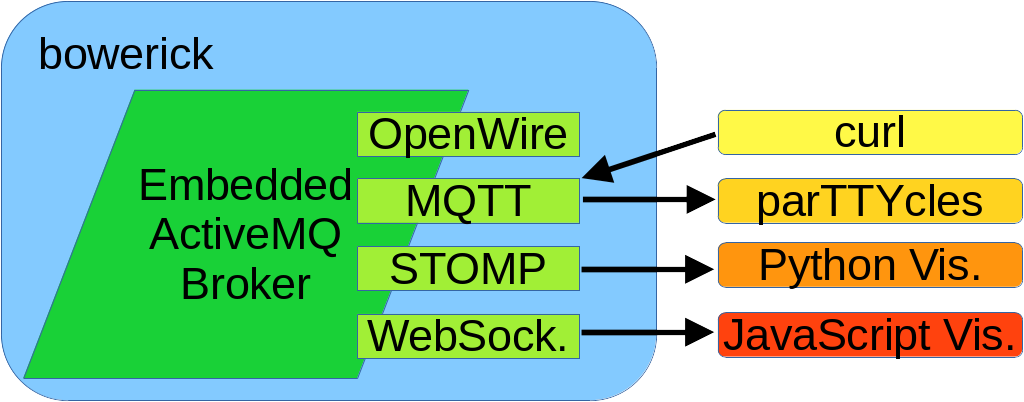
Integration via Polyglot Messaging
The message generator produces a list of “3D dots” with additional scale and color information. This data is serialized to JSON in UTF-8 strings and the UTF-8 strings are transferred in byte-array-messages.
The embedded ActiveMQ broker automatically bridges between the different protocols. Thanks to the standardized serialization (JSON -> UTF-8 -> byte-array-messages), the bridging between protocols is fully transparent such that each protocol can be equivalently used.
For the example shown in this post, the most distinguishing factor regarding the selection of one protocol over another was the availability and ease of use of a corresponding library that supports the protocol for the corresponding programming language. I basically ended up with the protocol choice as it is because it was the easiest way for me to implement the different parts in this way. Of course someone else may have other choices but in general, I very much enjoy this freedom of choice offered by the polyglot messaging part.
Animations
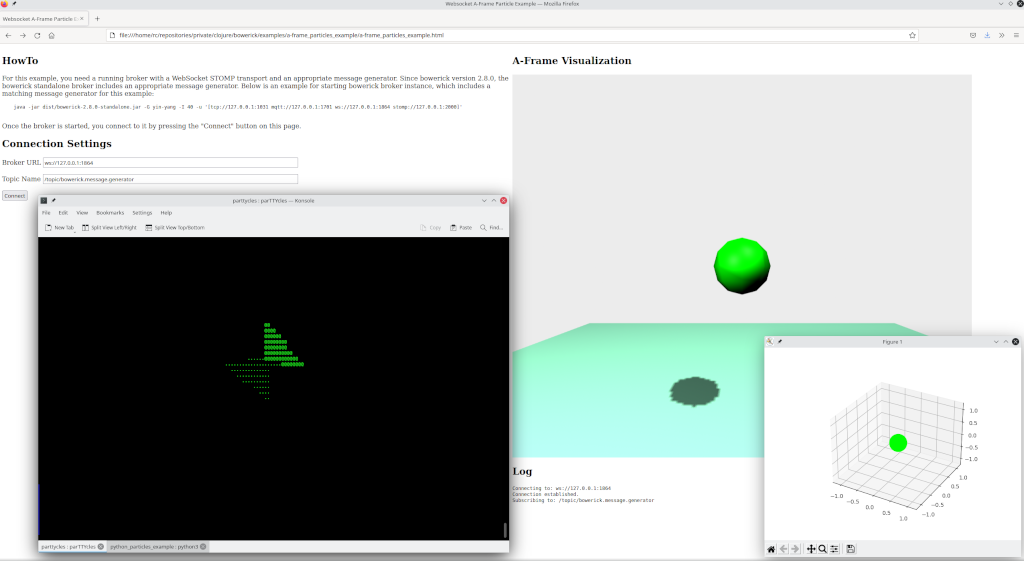
The animated image below shows the running data display that represents the rotating Yin Yang sign. The message generation was set to about 10 messages per second. So, the “animation frame rate” also corresponds to roughly 10 frames per second.
Animation Showing all Implementations
Running
Below, I provide instructions on running the applications as shown above.
To start the broker and message generation, download bowerick and run:
For the A-Frame example, clone the bowerick repository, open the corresponding web page in a browser, and follow the instructions.
Alternative Message Generation
Thanks to the loose coupling via the Message-oriented Middleware (MoM), alternative ways for generating messages can be easily implemented. In principle, any MoM will do. For my example, I will continue to use bowerick. The most important point for the alternative message generation is to start bowerick without the message generator, which can be done as follows:
In a previous post, I described some earlier experiments of cli4clj with GraalVM. Back then, it was still necessary to fall back to an older Clojure version. Fortunately, the ecosystem seems to be better suited now to properly use GraalVM “in production”.
Now, cli4clj can be used with GraalVM and the current Clojure version. I also added cli4clj to the grallvm-clojure list. graalvm-clojure also has instructions on building native binaries of Clojure applications.
In addition to better GraalVM support, the current cli4clj version also adds some minor fixes, e.g., regarding handling of CTRL+D and for running on Windows.
Also, thanks a lot to the entire community working on the various aspects of the ecosystem! 🙂
In this post, I write about new versions of two apps of mine, for which the roots roughly date back to the Nokia N900, N950, and N9. The post is about new versions of the “MeePasswords” password management and the “Q To-Do” to-do list management applications for Android.
MeePasswords is a password management application that dates back to the time of MeeGo/Harmattan and the Nokia N9 and N950. I started the development as there was no password management application for Harmattan back then. At least, I wasn’t aware of any.
Q To-Do is a simple to-do list application. It dates back even further than MeePasswords. It initially started as a J2ME application called “To-Do-O” (http://to-do-o.sourceforge.net/). To-Do-O originally targeted J2ME eSWT Symbian S60 like the Nokia 5800 XpressMusic. Later, I added support for the Maemo Fremantle on the Nokia N900. (See also libswt-hildon.)
Years ago, there had already been Android versions for MeePasswords and Q To-Do. However, they target comparably old Android versions and do not work with current Android versions.
Most of reviving MeePasswords and Q To-Do was mainly re-compiling the applications with a newer Qt version and using a newer Android NDK/SDK version. It was very nice to see that despite the long inactivity, most worked out of the box. Also, getting the Android build/development environment working was much easier than what I remembered from the last time I worked on these projects. However, there were some small steps that required extra work:
For MeePasswords, the biggest obstable was to get the Qt Cryptographic Architecture (QCA) working again. I wrote some feedback about this in the following forum thread: https://forum.qt.io/post/658738 Also thanks a lot to Marek for the original post and providing the cmake command line, which was the missing link for me to get things working again.
For Q To-Do, I wanted to give Qt6 a try and also try moving from qmake to cmake. I wrote some feedback about this in the following forum thread: https://forum.qt.io/post/660169
The new versions are available for Android as APKs for download:
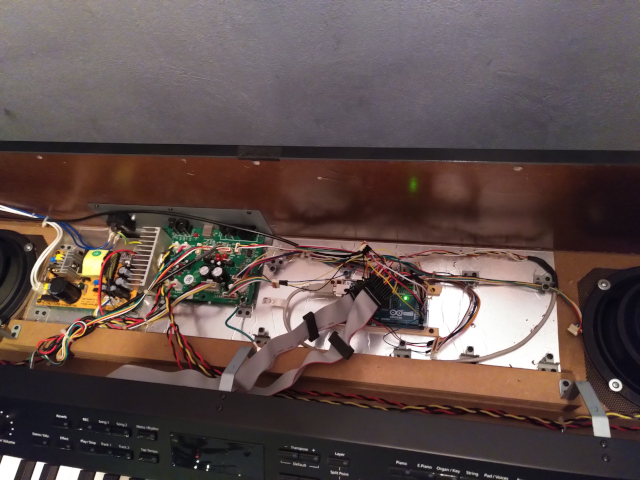
In this post, I write about a small do-it-yourself project I did end of last year: the repair of a defective digital piano I got. Below is a picture of the internals of the current state in which I replaced the defective parts with a custom programmed microcontroller.
Note: this should go without saying but just in case, before reading on, please be aware that this is not intended as a guide. Working with electrical equipment can be dangerous to you and your environment. If you still try to do anything of this you do this on your own responsibility and at your own risk!
It all started by purchasing a defective digital piano for a reasonably low price given that it did not work. My hope was that the problems could be fixed with reasonable effort. The first checks showed that the fuse was good. An on-board battery was empty. Unfortunately, replacing the battery was not enough to get the piano working again.
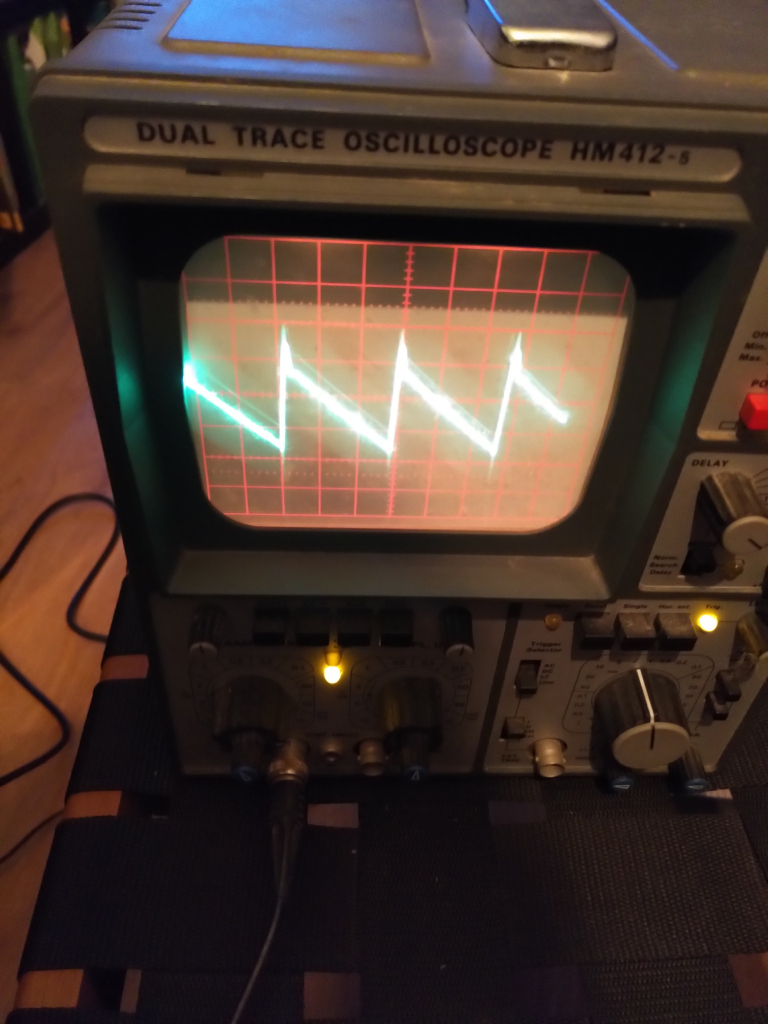
After some time without any further clues what could be wrong, I took this as a chance to get myself a used oscilloscope, which is a nice toy of its own.
It showed that one quartz was also defective. I could replace the quartz and it indeed helped a bit in the sense that the piano now could at least enter self-diagnostic. The self-diagnostic showed that RAM and ROM were OK.
Unfortunately, I think I broke something else on the way to this state such that it was still not possible to get the piano working. The self-diagnostic failed while testing the main chip that was responsible, e.g., for the audio generation.
As a kind of “Plan B”, I switched to a different approach: replacing the defective electronic parts with a custom programmed microcontroller. The idea is to read-out the piano keyboard and pedals and generate MIDI messages from that via the microcontroller. These MIDI messages are interpreted with a computer for generating the audio, which can be fed back to the piano amplifier and speakers.
As computer I use a Linux tablet with QSynth for generating the audio. This has the nice side-effect that it can serve as a “touch panel” for the keyboard that can also be used, e.g., for showing learning videos.
I chose an Arduino Mega 2560 as microcontroller because I needed many I/O ports. Below is a picture of a preliminary state.
It took me some experimenting and I even disassembled the keyboard partially to get a proper understanding of the pin out etc. On the Internet, the maintenance manual for the keyboard is available, which also provides valuable information on pin-outs etc. However, I do not link it here because, as said above, this is not intended as a guide.
Eventually, I reached a state with which I am reasonably happy. The current solution also detects the “strength”/”speed” of a key press and puts that information in the MIDI messages.
Last but not least, I also connected the front panel buttons and LEDs to the microcontroller. Because I control all settings via the Linux-based tablet that I use for sound generation, I do not have any use for the buttons so far. However, I programmed the LEDs to display some “idle screensaver” like animation after some time when nobody is playing.
As I am mostly programming in Java, Clojure, Python, and even some JavaScript these days, it was a nice change to do something with a microcontroller that involved stuff like interfacing with GPIO. The source code for the microcontroller is available on GitHub.
The part of GraalVM that interested me, right now, was the capability to build native executables for JVM-based software. However, this post is not about introducing GraalVM. For more information about GraalVM, see, e.g., the GraalVM website or Jan’s blog post on Clojure with the GraalVM.
For building the native image, I first created a standalone Jar via “lein uberjar”. Afterwards, I used GraalVM’s native-image to build the native image:
~/r/p/c/cli4clj ((ec7ba86a…)) ~/Downloads/graalvm-ce-1.0.0-rc12/bin/native-image --no-server --report-unsupported-elements-at-runtime -jar target/cli4clj-1.7.2-standalone.jar
[cli4clj-1.7.2-standalone:17220]    classlist:   5,198.22 ms
[cli4clj-1.7.2-standalone:17220]        (cap):   1,395.43 ms
[cli4clj-1.7.2-standalone:17220]        setup:   3,496.17 ms
[cli4clj-1.7.2-standalone:17220]   (typeflow): 335,004.07 ms
[cli4clj-1.7.2-standalone:17220]    (objects):  31,205.97 ms
[cli4clj-1.7.2-standalone:17220]   (features):     746.55 ms
[cli4clj-1.7.2-standalone:17220]     analysis: 368,574.15 ms
[cli4clj-1.7.2-standalone:17220]     universe:   7,927.50 ms
[cli4clj-1.7.2-standalone:17220]      (parse):   9,650.90 ms
[cli4clj-1.7.2-standalone:17220]     (inline):   5,801.23 ms
[cli4clj-1.7.2-standalone:17220]    (compile):  50,067.12 ms
[cli4clj-1.7.2-standalone:17220]      compile:  67,484.15 ms
[cli4clj-1.7.2-standalone:17220]        image:   4,716.99 ms
[cli4clj-1.7.2-standalone:17220]        write:     552.31 ms
[cli4clj-1.7.2-standalone:17220]      [total]: 458,269.09 ms
However, to make this work, I had to do some adjustments to cli4clj to “make GraalVM happy”:
Add a customized version of clojure.main/skip-whitespace, which adds type hints and removes the “readLine” case.
Furthermore, there is still a minor lurking issue. The verbose exception printing, which is disabled by default, will not work yet as clojure.stacktrace/print-cause-trace is not “GraalVM friendly” yet. I did not address this aspect yet as it only concerns a minor use case and I wanted to experiment a bit first. In future, if GraalVM support proofs valuable, I will try to fix this.
As a result of the native image generation, I got an ~37 MB executable of the cli4clj example. Note that I used dynamic linking on Linux, which caused the following shared object dependencies:
Note that the reported system time is rather meaningless as the cli4clj example does not automatically terminate but waits at the command input prompt. So, the reported system time mainly depends on how quickly I pressed “q” for terminating the example application.
The other reported values are not impacted that notably by this peculiarity.
The start-up time of the native version is notably faster, which can also be observed in the reported user time and CPU usage. Furthermore, the memory footprint of the native version is less than a third of the Jar file counterpart.
If you want to try the example yourself, you can clone the clojured_2019 branch of the cli4clj repository and run the example via “lein run” (for the normal scrolling mode) and “lein run — alt” (for the alternate scrolling mode).
Huge thanks to everyone (organizers, attendees, speakers, etc.) involved in :clojureD. It was an honour to get the opportunity to present cli4clj at :clojureD. I enjoyed the conference a lot and had a great time exchanging thoughts and ideas with the lovely community.
In this post, I briefly introduce a newly added “alternate” scrolling mode for cli4clj, a library for easing the implementation of interactive command line interfaces (CLIs) for Clojure applications.
Since quite some time, I had been a bit unhappy about how repeated and asynchronous output is handled for CLIs implemented with cli4clj. The main cause of the problem is that, simply speaking, everything (commands, command output, completion hints, user input, etc.) is printed into the same shell. This causes the situation that repeatedly printed asynchronous output interferes with user input. Which ultimately causes the problem that the interactive CLI can become hardly usable or completely unusable. Below, an animated gif illustrates the problem.
To solve this situation, I added a first version of an “alternate” scrolling mode. The idea of the alternate scrolling mode is to split the shell into different areas:
one for showing “scrolling” output
one for entering and editing commands,
and one for displaying completion hints and “special” output such as error messages.
Below an example of the alternate scrolling mode is shown.
The largest area at the top above the line is used for printing the “scrolling” output. Below the line, input can be entered at the usual prompt. Below the prompt, “special” output such as completion hints or errors are printed.
The alternate scroll mode can be enabled by setting the key “:alternate-scrolling” to “true” in the cli4clj options map. Alternatively, a predicate function returning a Boolean value can be set.
In addition, the height of the area underneath the prompt reserved for the special output can be adjusted by setting the “:alternate-height” key to a corresponding integer value.
You can try the alternate scrolling mode yourself in the example application by passing “alt” as argument, e.g., by starting it via Leiningen as follows: “lein run — alt”
With the alternate scrolling, I am mostly scratching my own itch. However, I hope that some of you will also have good use cases for the alternate scrolling mode. I would be very happy to hear if cli4clj is helpful for you or if you have constructive comments or feedback.
cli4clj aims on easing the implementation of interactive command line interfaces (CLIs) targeting “everyone” as CLI users. One implication of “targeting everyone” is that CLIs implemented with cli4clj should be usable by “non-lispers”. Thus, cli4clj purposely does not use lisp- or Clojure-style syntax for the commands in the interactive CLI, even though it uses the Clojure REPL underneath.
Yet, people familiar with Clojure or Lisp may miss the functionality of the “full” Clojure REPL. For me, the point of missing the full Clojure REPL was reached when I had to enter quite a long list of almost repetitive arguments in one of my applications.
To counter this, cli4clj had for quite some time the, admittedly pretty hidden, :allow-eval option, which defaults to false. Setting :allow-eval to true causes that “classical” Clojure input will also be processed in cli4clj-based CLIs.
However, even with :allow-eval true, the “cli4clj world” was split into two parts, the cli4clj commands configured in the cli4clj configuration map and the “full” Clojure REPL. It was not possible, e.g., to use cli4clj commands with the Clojure-style syntax.
With cli4clj version 1.5.3, two things changed:
:allow-eval now defaults to true.
cli4clj commands can be used with the Clojure-style syntax.
To illustrate the effect of these changes, I use the print-cmd from the example CLI provided with cli4clj. print-cmd takes one or more arguments and prints some information about the supplied arguments. Below, the definition of print-cmd is shown:
...
 :print-cmd {:fn (fn [arg & opt-args]
                   (print "Arg-type:" (type arg) "Arg: ")
                   (pprint/pprint arg)
                   (print "Opt-args: ")
                   (pprint/pprint opt-args))
             :short-info "Pretty print the supplied arguments."
             :long-info "This function pretty prints its supplied arguments. It takes at least one argument."}
...
One use case of the mixed cli4clj- and Clojure-syntax is to ease the assembly of almost repetitive argument lists. Below, an example for programmatically assembling and applying a long argument list is shown:
I hope these changes achieve a good compromise between still keeping cli4clj easy to use for basic use cases while enabling more sophisticated functionality for advanced use cases. If you have constructive feedback or comments, please let me know.
This is a bit delayed announcement of the release of test2junit 1.4.0. test2junit lets you “Emit Clojure test output in Junit XML format and optionally automatically invoke HTML generation.”
With some version 1.3.x of test2junit, I added a bit more colorful command line output. What I did not consider back then was that this output may “break” test2junit in cases in which its output is redirected, e.g., when running it in a continuous integration environment.
With version 1.4.0, I added an option to silence the test2junit command line output. To silence the output, set “:test2junit-silent true” in your project.xml.
I hope this update is useful for you and fixes issues for people for which the 1.3.x versions caused trouble. If you have constructive feedback, please let me know.


You must be logged in to post a comment.